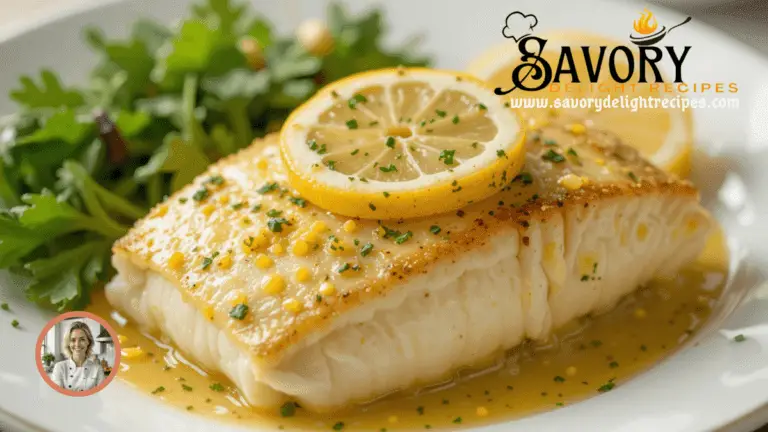
Creating restaurant-quality lemon butter baked cod takes just 25 minutes. This elegant seafood dish requires less time than ordering takeout.
This foolproof recipe delivers impressive results with fresh or frozen cod filets. Cod makes a heart-healthy choice with 243 calories per serving and 31g of protein. Simple ingredients like garlic, lemon, and butter revolutionize this white fish into a restaurant-worthy masterpiece.
You can become skilled at making perfect lemon butter baked cod that’s both delicious and nutritious. Let’s tuck into the professional techniques that will raise your seafood game effectively.
Essential Ingredients for Restaurant-Quality Cod
Quality ingredients are the foundations of restaurant-quality lemon butter baked cod. You’ll create that perfect, professional-grade dish by knowing how each ingredient works.
Choosing the Best Cod Filets
Atlantic cod features snowy white flesh and a delicate, flaky texture. Its mild and savory flavor makes it perfect for baked preparations. Pacific cod from Alaskan waters gives you a slightly firmer texture and sweeter taste. The best filets should be about 1-inch thick to cook perfectly.
You might be surprised that frozen cod could be better than “fresh” cod sitting on ice at markets. We froze most cod right after catching it to keep its natural quality. The fish should smell fresh and slightly briny without any strong fishy odors.
Butter and Lemon Selection Tips
Unsalted butter lets you control the dish’s saltiness better. European-style butter adds extra creaminess to your final dish.
Fresh lemon is vital – both zest and juice play significant roles. Bottled lemon juice won’t work in this recipe because it has a preserved flavor that stands out too much. The best results come from using both lemon zest and juice to create depth of flavor.
Fresh vs Dried Herbs Effect
Your choice between fresh and dried herbs changes your cod dish’s final taste by a lot. Fresh herbs taste best in dishes with short cooking times and keep their distinctive flavors. Here’s what you should know about picking herbs:
- Fresh herbs like parsley, tarragon, and chives give you better results when used raw or cooked briefly
- Dried herbs, including thyme, oregano, and marjoram, work better in dishes that cook longer than 15 minutes
You should use one-third the amount of dried herbs compared to fresh ones. A recipe needing one tablespoon of fresh herbs needs just one teaspoon of dried alternatives. Add fresh herbs near the end to keep their vibrant flavors. Dried herbs need longer cooking times to develop their full taste.
Mastering the Lemon Butter Sauce
You need precision and technique to create the perfect lemon butter sauce. Simple ingredients become a silky, restaurant-worthy sauce when you pay careful attention to detail and use the right method.
Perfect Butter-to-Lemon Ratio
High-quality unsalted butter forms the foundation of an exceptional lemon butter sauce. You should melt the butter over low heat to prevent burning. 3 tablespoons of butter with the juice of one large lemon will give a balanced sauce. The sauce should be prepared just before serving to keep its best texture and temperature.
Adding Depth with Aromatics
Your sauce becomes more complex and professional with carefully selected aromatics. These key components will raise your sauce’s flavor:
- Fresh minced shallots (sautéed until translucent)
- Finely chopped garlic (cooked until fragrant)
- Fresh herbs like parsley and chives
- White wine for depth
- Fresh lemon zest
We cooked shallots until they turned translucent, which took about 3 minutes. The garlic should be added just until fragrant, about 15-20 seconds, so it doesn’t develop bitter notes.
Professional Emulsion Techniques
A stable, silky sauce comes from proper emulsion technique. Professional chefs use beurre monté – a method where they whisk cold butter into simmering water to create a stable emulsion that holds up to 180-190°F. Here’s how to do it:
Begin with a small amount of simmering water (1-2 oz) and slowly whisk in cold, cubed butter. The sauce must stay below 190°F to avoid breaking. Constant whisking breaks down fat into tiny droplets and creates a creamy, stable sauce that sticks perfectly to your cod.
The best results come from adding butter gradually – about 3 tablespoons at a time – while whisking vigorously between additions. This approach creates a slowly emulsified sauce instead of quickly melted butter. Note that if the sauce separates, it will taste the same but lose its silky appearance.
Professional Baking Techniques
Becoming skilled at perfect temperature and timing will revolutionize ordinary cod into an exceptional dish. Success depends on precise oven settings and attention to detail.
Temperature and Timing Secrets
Your oven should be set to 400°F to create the perfect environment for baking cod. This temperature lets the fish cook evenly while keeping its moisture. Standard filets need 10 to 12 minutes of cooking time. Thicker pieces might need 1-2 extra minutes.
The sweet spot for perfectly cooked cod’s internal temperature lies between 130°F and 135°F. Your fish will maintain its delicate texture while being fully cooked at this range. The final internal temperature should reach 145°F for food safety.
Visual Cues for Perfect Doneness
Expert chefs look for these specific signs to know when cod is perfectly cooked:
- The flesh turns from translucent to pearly white and opaque
- The fish flakes easily with gentle fork pressure
- The center feels firm but has a slight give
- Edges develop a subtle golden-brown color
These visual cues usually appear around the 10-minute mark at 400°F. The oven door should stay closed during cooking to maintain consistent temperature.
Pan Selection and Positioning
Your choice of baking vessel will affect the results. A glass baking tray works best because it retains heat and cooks evenly. The rack should sit in the middle of your oven for the best heat distribution.
You can get better results by covering your baking tray with aluminum foil or parchment paper. This method helps keep moisture in and gives you tender, juicy fish. Both sides of the cod filets need a drizzle and rub of olive oil, followed by a 5-minute rest before seasoning.
Note that cod filets need enough space in the baking dish. A little contact between pieces is fine, but crowding causes uneven cooking and longer baking times. Frozen filets should thaw completely and be patted dry with paper towels to prevent excess moisture from ruining the cooking process.
Common Mistakes to Avoid
Getting lemon butter baked cod right means avoiding mistakes that can ruin its texture and taste. A good understanding of what can go wrong will help you nail the recipe every time.
Temperature Control Errors
The right temperature is a vital part of cooking cod perfectly. Your fish will start to dry out when proteins shrink and coagulate above 140°F. Take the cod off heat when it hits an internal temperature of 140°F and let it rest until it reaches the food-safe 145°F.
Fish proteins are more sensitive to heat than meat proteins. Your cod should sit at room temperature for 30 minutes before cooking. This simple step helps balance the temperature between the inside and outside of the filet and gives you even cooking results.
Sauce Breaking Prevention
A broken sauce can make your lemon butter cod look less appetizing. The timing is a vital part of creating a stable sauce. The process might look simple, but you need to pour heavy cream slowly while stirring to stop it from curdling in too much heat.
Here’s what you need to know about keeping your sauce stable:
- Keep heat low to medium when simmering
- Stir constantly during reheating
- Add liquid gradually while mixing
- Never use a microwave for reheating
Overcooking Solutions
Yes, it is overcooking that ruins most cod dishes. Fish cooks faster – a cod filet might need as little as 4 minutes based on its thickness. All the same, you can try these techniques to avoid overcooking:
Look for visual signs to check if it’s done. The fish should look opaque and flake easily without force. As with properly cooked cod, it should give slight resistance when pressed gently with a fork, without feeling mushy.
Frozen filets need proper thawing under cool running water or overnight in the fridge. Pat the fish really dry with paper towels afterward – this step will give a better texture.
A cake tester is a great tool to check doneness. Slide it sideways into the filet – once it goes through smoothly without resistance, your fish is ready to come off the heat. This method helps you find the sweet spot between raw and overcooked cod.
Plating Like a Restaurant Chef
Professional plating turns a simple lemon butter baked cod into an artistic culinary masterpiece. Your dish’s visual appeal affects both how people perceive it and how it tastes.
Sauce Presentation Methods
Think of your plate as a canvas. The “swoosh” technique creates an elegant foundation for lemon butter sauce presentation. You’ll want to place a generous dollop of sauce and use the back of a spoon to create a graceful arc across the plate. The sauce should cover about one-third of the plate’s surface. This gives your dish visual appeal and ensures enough sauce with each bite.
Your sauce’s temperature plays a crucial role in presentation quality. Keep the sauce between 180-190°F to maintain its silky texture and prevent breaking. A broken or curdled sauce ruins both the look and feel of your dish. The cod should go on the plate right after sauce application to keep everything at the right temperature and consistency.
Garnishing Techniques
The right garnishes raise your lemon butter baked cod to new heights. Here’s what makes garnishing work:
- Only use edible items that boost both flavor and looks
- Arrange garnishes in groups of three or five to catch the eye
- Pick items that match the dish’s colors
- Place microgreens and herbs around the edges just right
Height and dimension matter in plating. The cod works best slightly off-center, and you can build upward by stacking components carefully. Fresh herbs work double duty as garnish and flavor enhancer. Parsley, chives, and microgreens add bright colors that complement the lemon butter sauce beautifully.
Color and Texture Balance
Visual contrast makes professional presentation pop. White plates make the golden hues of your lemon butter baked cod stand out. Different textures excite multiple senses – flaky cod against smooth sauce creates magic on the plate.
The rule of thirds makes plating more interesting. Your main elements should sit off-center rather than in the middle. This guides your guest’s eye across the plate naturally. Empty space matters too – a crowded plate looks amateur.
Seasonal vegetables add natural color balance. Fresh produce brings color without looking artificial. White cod, golden sauce, and bright vegetables create a palette that makes people hungry.
The core team knows that good cooking sets the stage for beautiful plating. A perfectly cooked cod shows off its natural flakiness and pearly white color. It becomes the star of the show, with lemon butter sauce flowing around it to promise an amazing meal.
Conclusion
Making restaurant-quality lemon butter baked cod just needs attention to detail. These techniques will change your home-cooked seafood dishes. Quality ingredients, perfect sauce, and precise cooking temperatures are the foundations of an outstanding result.
Professional techniques for temperature control and timing will help you get that perfect flaky texture chefs want. A well-emulsified lemon butter sauce raises this simple fish dish into an impressive culinary creation.
The best cod comes from using quality ingredients and maintaining proper temperatures. Your plating should be purposeful and precise. These proven methods will help you create lemon butter baked cod that matches any restaurant’s version.
FAQs
Q1. What’s the ideal temperature and cooking time for baked cod? Bake cod at 400°F for 10-12 minutes. The fish is done when it reaches an internal temperature of 145°F, turns opaque white, and flakes easily with a fork.
Q2. How can I prevent my cod from becoming rubbery? To avoid rubbery cod, ensure it’s fully thawed before cooking and avoid overcooking. Remove the fish from heat when it reaches an internal temperature of 140°F and let it rest to reach the food-safe temperature of 145°F.
Q3. What’s the secret to a perfect lemon butter sauce for cod? The key is to use high-quality unsalted butter and fresh lemon juice. Combine 3 tablespoons of butter with the juice of one large lemon. Add depth with aromatics like shallots, garlic, and fresh herbs. Use proper emulsion techniques to achieve a silky texture.
Q4. How do I plate cod like a restaurant chef? Start with a “swoosh” of sauce on the plate. Place the cod slightly off-center and add garnishes in odd-numbered groupings. Use edible components that enhance both flavor and appearance. Incorporate contrasting colors and textures, and leave some negative space on the plate for a professional look.
Q5. What are some common mistakes to avoid when cooking cod? Common mistakes include temperature control errors, overcooking, and improper sauce preparation. To avoid these, use a thermometer to monitor the fish’s internal temperature, pay attention to visual cues for doneness, and follow proper techniques for creating a stable sauce.
7 thoughts on “How to Make Restaurant-Quality Lemon Butter Baked Cod (Foolproof Recipe)”
Comments are closed.